Mitosis Image Processing Part 1 - Template Matching Using OpenCV
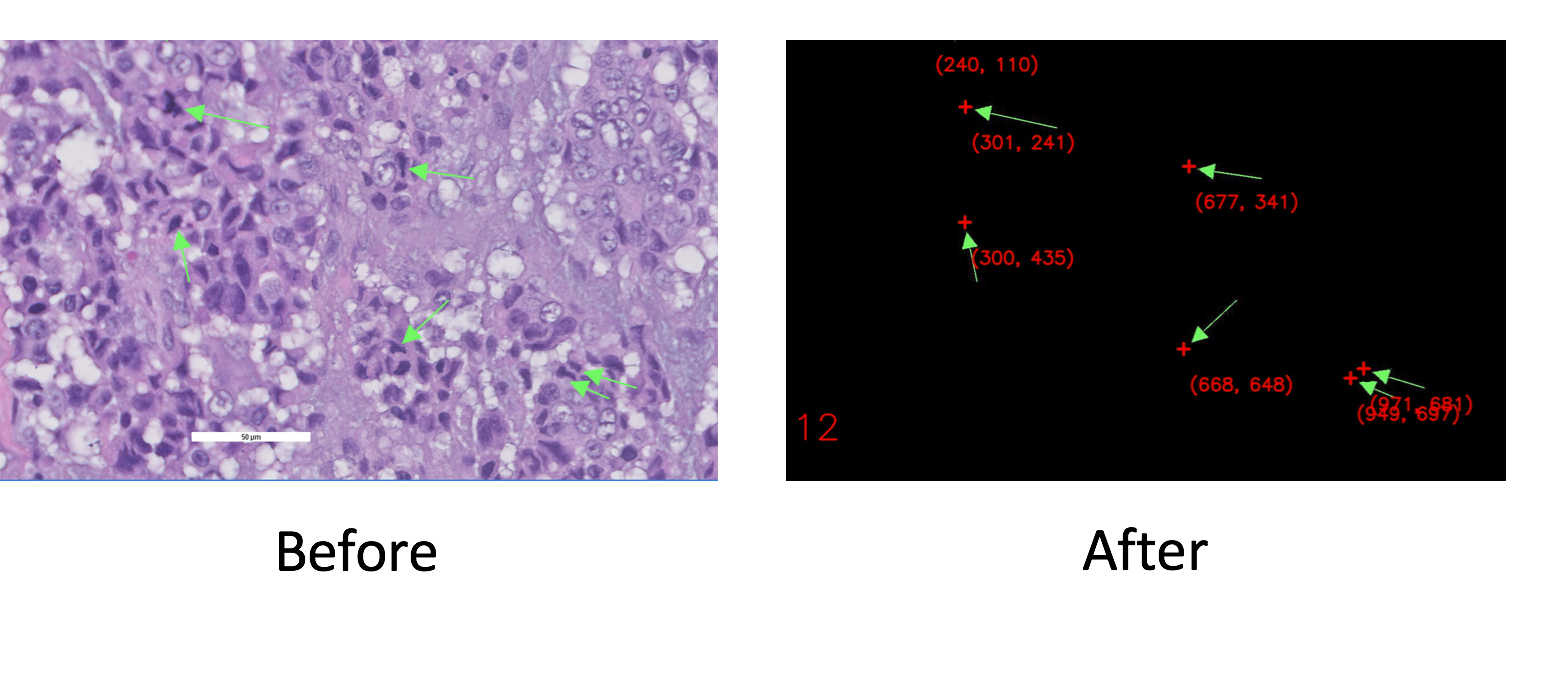
After my first task of developing the Django web application at my summer internship, my second project, to my great excitement, is a lot more algorithmically involved. It involves processing raw data annotations into a format suitable for training Machine Learning algorithms.
Here’s the preamble. My research group is working on training a neural network to detect mitosis (cell division) in breast cancer histological images (See ICPR 2012 Mitosis Detection Contest). Apparently, mitosis count is a good measurement of the aggressiveness of cancer tumors. But mitosis detection is a very challenging task for a computer, because of its indistinctness and its variability. To the untrained eye, such as mine, a cell undergoing mitosis also looks pretty much the same as a regular cell. There are also four stages of mitosis, each with a different shape configuration. My future work involves improving our mitosis detection model. Exciting, but that is a job for another day.
Today’s Awesome Problem
Equally awesome is my current undertaking. Since this is another collaboration between IHPC and one of Singapore’s hospitals, we are training our neural net using data provided by our partner. However, the data was annotated in a very raw format, in the form of these:
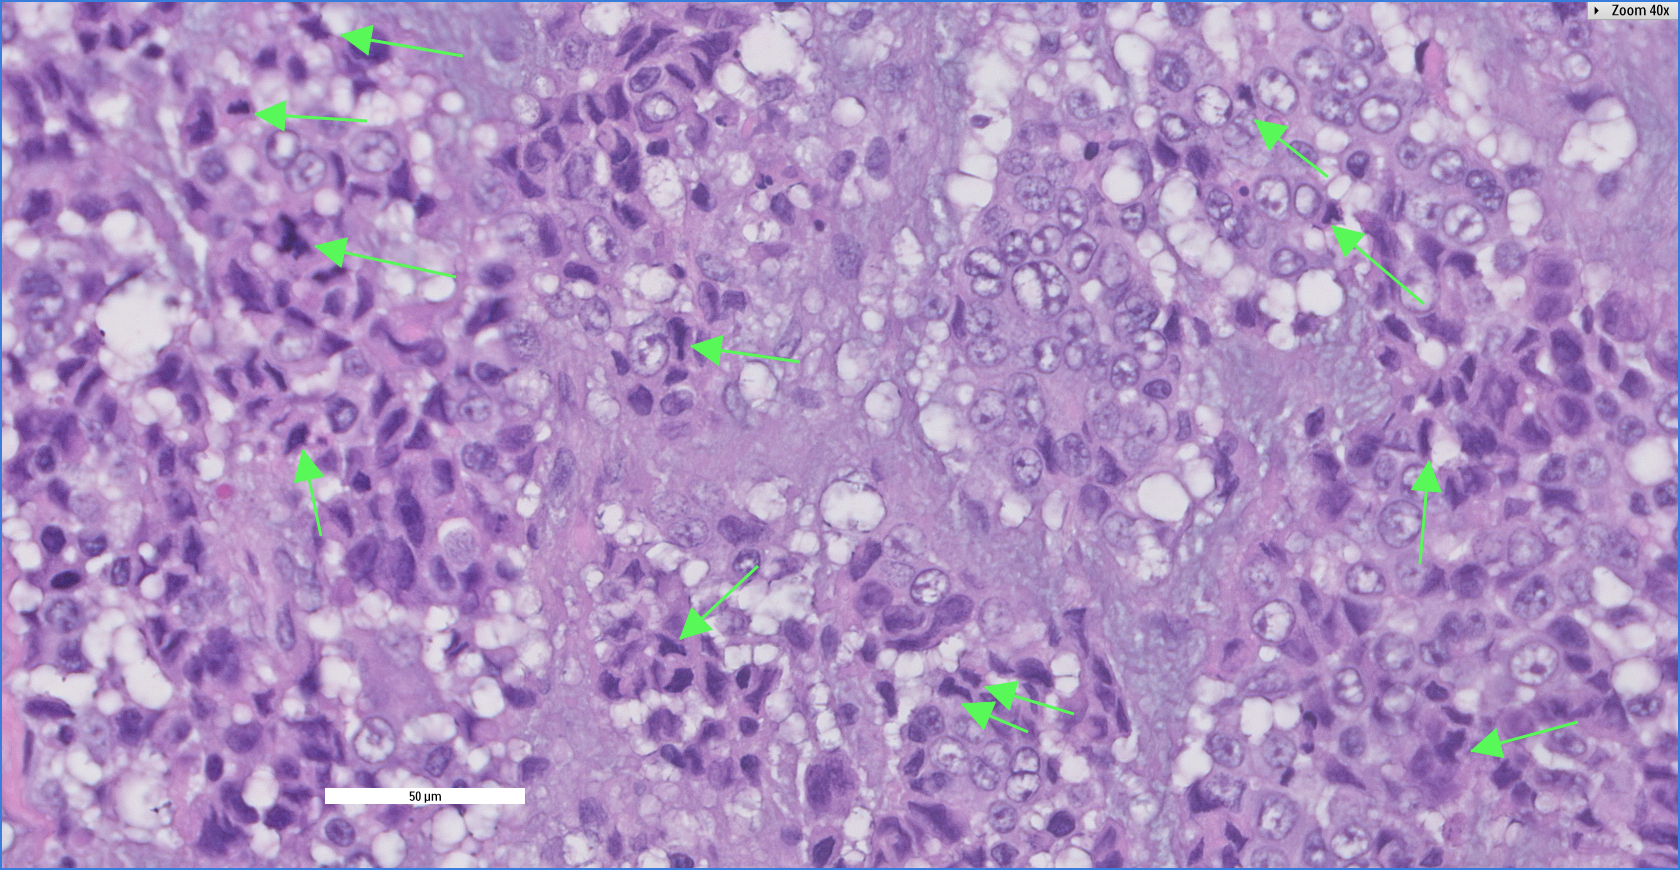 Training data in its original form
The pain was two-fold. One, individual cells used for training must be cropped by hand. Two, the neural net would output of a set of pixel coordinates, and having no coordinate information, it was again up to the human eye to compare it to the images with green arrows.
I’m thus armed with the following goal:
- Write a program that, given an image with green arrows, outputs the pixel coordinates of where the arrows are pointing.
I Have No Clue, But That’s Awesome
I absolutely love this problem for two reasons: One, it’s meaningful as it drastically reduces human workload. Two, it’s a problem where I have no frickin’ clue how to solve, which in other words, mean it’s the best chance to learn something new!
It is indeed trivial to find the color green in the images. But I need to know where the arrows are pointing, which requires knowing their orientation. I soon realized this is a lot more involved than finding green. Also, I happen to have zero computer vision experience. However, having no clue is what inspires me to tackle a problem, and I quickly set to work figuring out a line of attack.
My first thought was to use a neural net, which I will train to give me the locations of arrow tips. But this felt like a bad solution because it requires a lot of knob-tuning, and it’s a black box.
Computer Vision whizzes on Quora pointed me in the right direction: Template Matching! Initially, I was thrown off by the fact that my arrows had different orientations. Did I have to implement a method that was rotationally-invariant? (Kim & Araujo, 2007) In the end, I went with a simple solution that avoided such overkill. I had 360 templates, one for each degree of rotation, and use the template matching methods in openCV.
This would help me place bounding boxes on arrows, as well as the rotation information of the arrows. With a bit of trigonometry, I can then extract information about the actual location the arrows are pointing.
Writing the Algorithm
My template matching algorithm is summarized as so:
- Strip the background from the images. This improves matching by removing distracting elements.
- Make 360 templates, one for each degree of rotation.
- Match each image with 360 templates. (Fortunately, this is fairly fast for my small templates. Also probably faster rotational-invariant feature matching techniques, which I saw people complain on StackOverflow to be painfully slow)
- Knowing the match locations and orientations, I can transform the points to recover the final location of arrow tips (I will talk about this in Part 2)
Step 1 is trivial, as all the images had the same shade of green arrows. All I had to do was zero the non-green vectors in the RGBA matrix. I also did some parallel processing to speed this up for bulk processing of images (see complete code at bottom of page). Step 2 was likewise easy using SciPy, with this as my base template:

import numpy as np
import os
from scipy import misc, ndimage

IMG_DIR = {path to original images}
STRIPPED_DIR = {path to save stripped images}
TMPL_DIR = {path to templates}

GREEN = np.array([89, 248,  89])

def strip(img_name):
    """ Removes background from img_name in IMG_DIR, leaving only green arrows.
    Saves stripped image in STRIPPED_DIR, as img_name's'.jpg
    """
    print('Stripping img %s' %img_name)
    arr = misc.imread(os.path.join(IMG_DIR, img_name))
    (x_size, y_size, z_size) = arr.shape
    for x in range(x_size):
        for y in range(y_size):
            if not np.array_equal(arr[x, y], GREEN):
                arr[x, y] = np.array([0, 0, 0])
    img_name = "".join(img_name.split('.')[:-1])
    misc.imsave(os.path.join(STRIPPED_DIR, img_name+'_s.jpg'), arr) #eg M21_s.jpg
    return

def make_templates(base='base.png'):
    """ Makes templates for rotational-deg=0...359 from base in TMPL_DIR.
    Saves rotated templates as tmpl{deg}.png in TMPL_DIR
    """
    base = misc.imread(os.path.join(TMPL_DIR, base))
    for deg in range(360):
        tmpl = ndimage.rotate(base, deg)
        misc.imsave(os.path.join(TMPL_DIR, 'tmpl%d.png' %deg), tmpl)
    return
Next, following this wonderful tutorial, I had step 3 functioning in no time. The algorithm uses the cv2.TM_CCORR_NORMED method on greyscaled images, with a match-acceptance threshold of >0.9. It worked 99% of the time. But, in accordance with the power law of programming, that remaining 1% gave the biggest headache. Some edge cases gave me unacceptable false negatives:
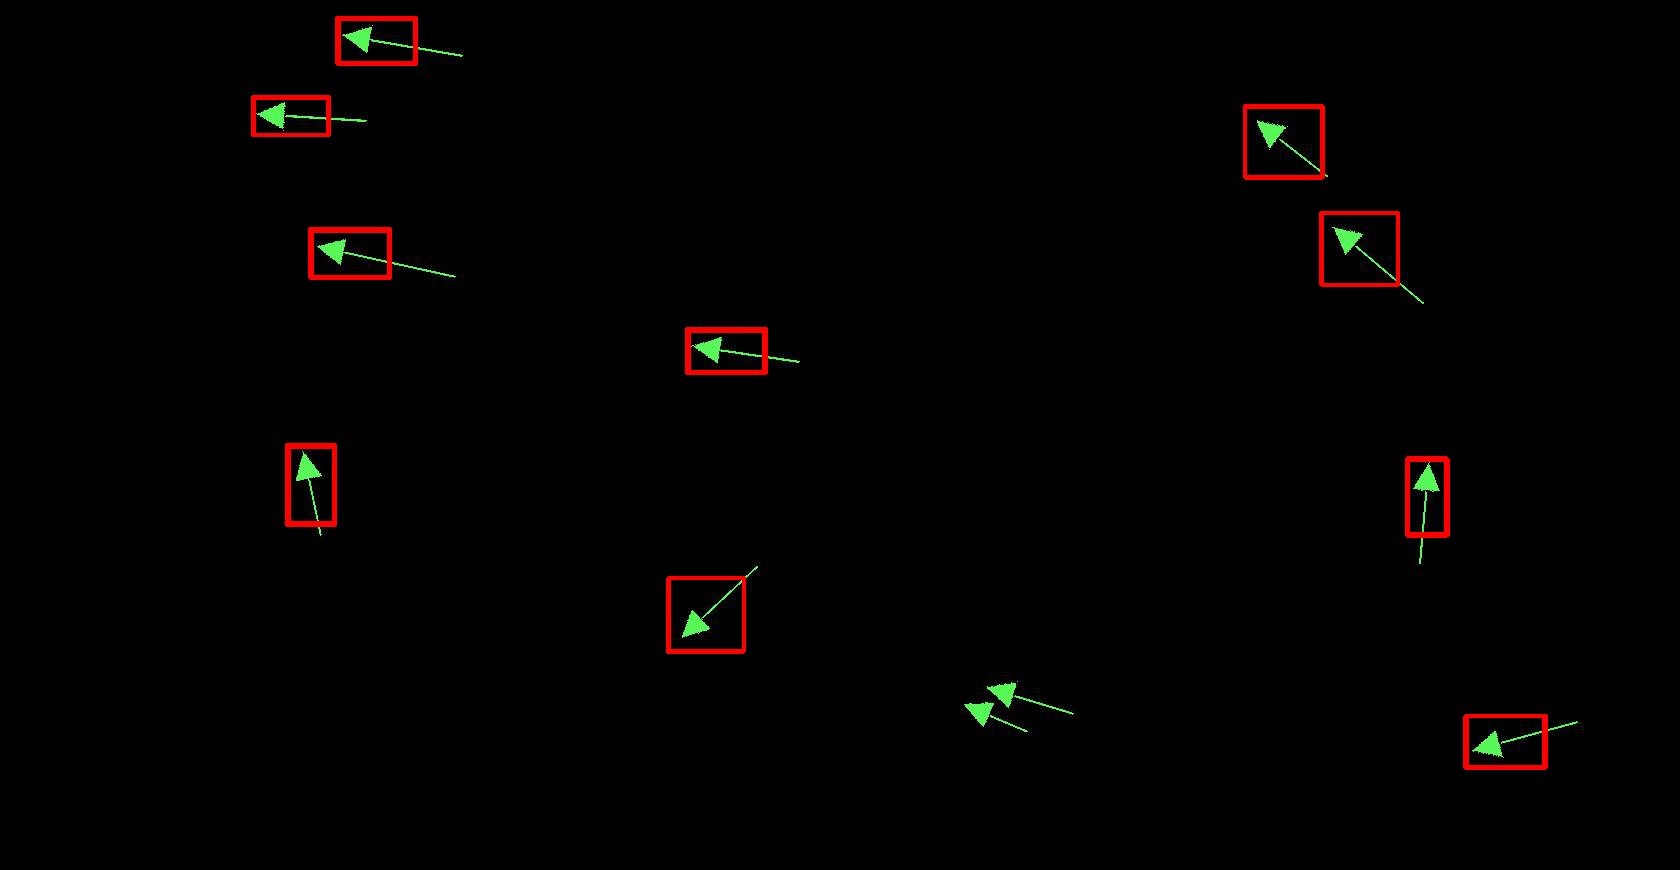
False negatives (cv2.TM_CCORR_NORMED, acceptance threshold >0.9)
I could simply lower the threshold, but that gave me a ton of false positives before all the ground truths (ML lingo for the “real, actual positives”) were accepted. Due to the nature of the problem, it had to work 100%, and I needed a perfect solution.
I realized the problem was due to the proximity of the arrows, such that they would overlap with the back region of the templates during matching. The black background in the templates must be somehow excluded from the correlation.
To my dismay, openCV does not support alpha-dependent matching. As reluctant as I was to reinvent the wheel, I mentally prepared myself to write my own matching algorithm.
But then I stumbled upon an article about a new masking feature for openCV 3.2 in C. Aha! I couldn’t find useful information because there simply wasn’t documentation for openCV 3.2 for Python! Masks were my solution.
To create masks for each template, I used openCV’s thresholding feature, which converted my templates from grayscale to black and white. The black regions acted as the “opaque” mask, allowing the white “transparent” regions to be factored into the correlation calculations.

Example of a template after thresholding
Tuning the masks to work with openCV’s matchTemplate() method was another issue for me. Although TM_CCORR_NORMED now correctly identified my true positives, it gave me false positives that are even stronger than the true ones.
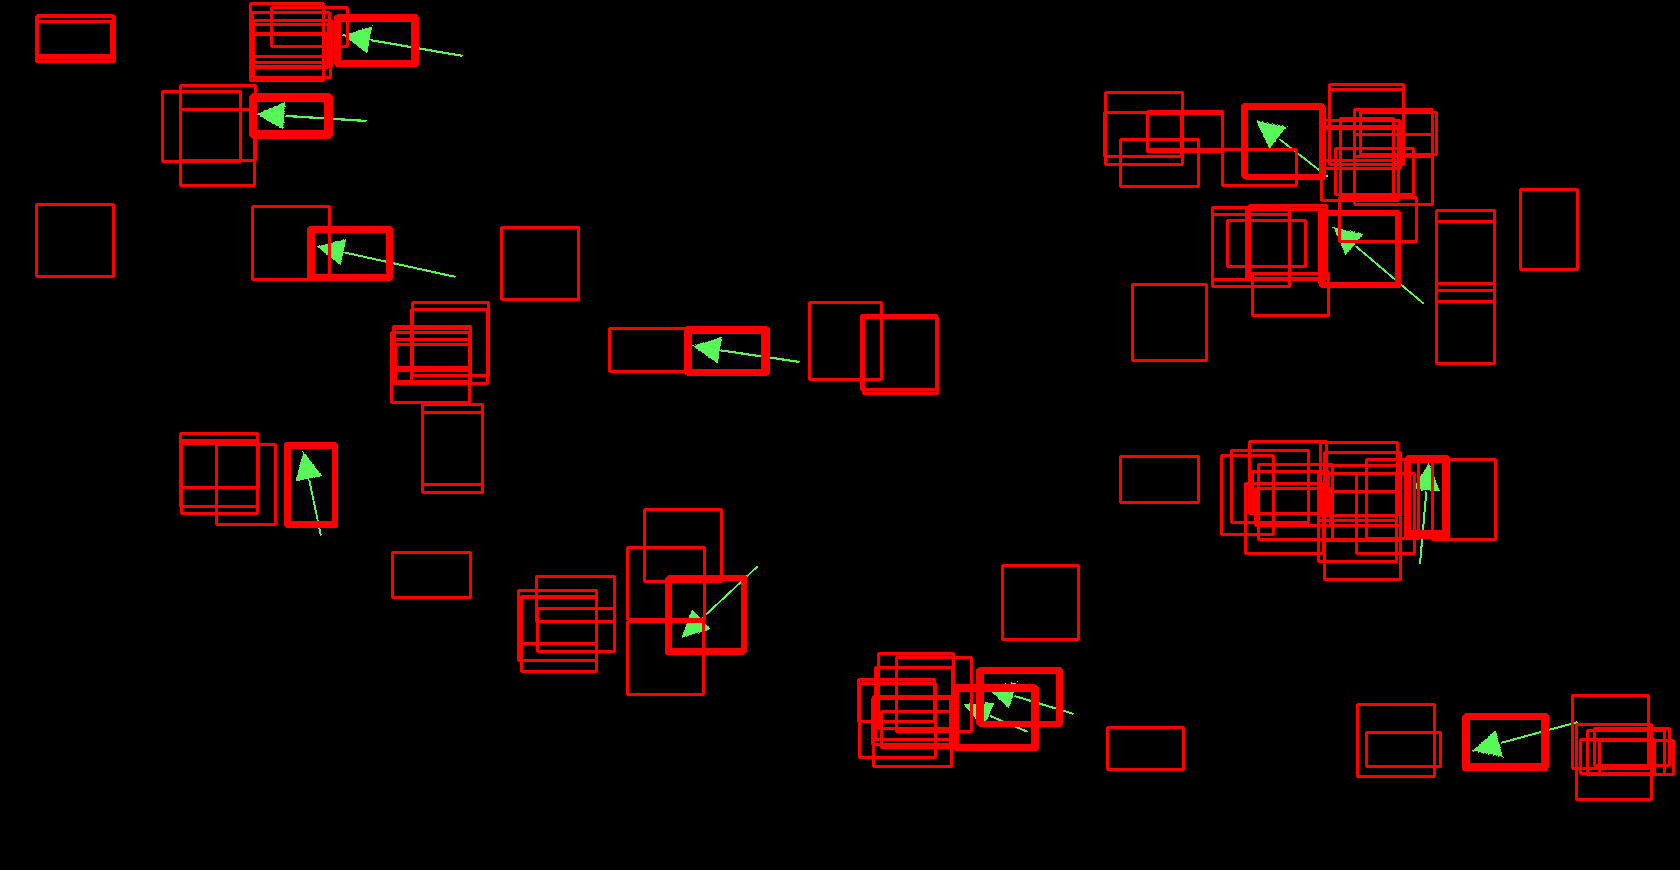
False positives (cv2.TM_CCORR_NORMED, acceptance threshold >0.9)
To this end, the wonderful folks on StackOverflow helped me tremendously. Using, the matching method TM_SQDIFF and a new threshold of <11 (empirically tuned), and using png templates and masks instead of jpeg did the trick. Note that non-matches have correlation of >200, so a acceptance threshold of 11 is really good.
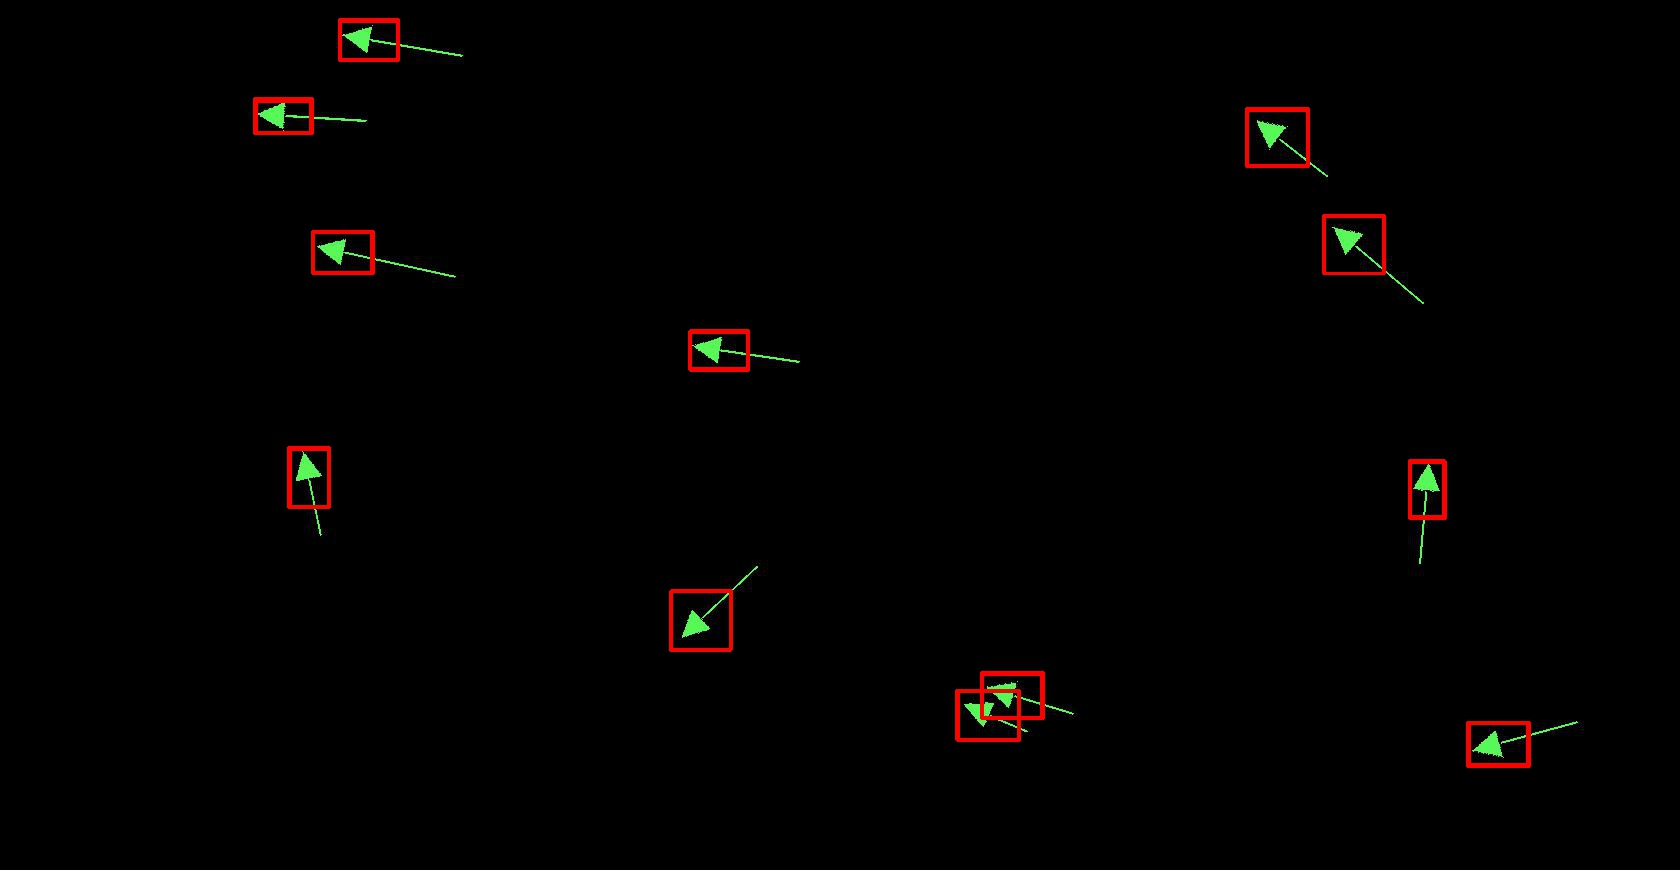
Success! (cv2.TM_SQDIFF, acceptance threshold <11)
Cool was learning why TM_CCORR_NORMED did not work with jpeg.
Because TM_CCORR_NORMED is a normalized function with the denominator that it has, the black backgrounds meant I was dividing by 0 in many cases. This is not cool, but having a matrix entry of numpy.nan wasn’t the issue because the comparison nan>threshold yields false. The key was with the jpeg format. Because of lossy jpeg compression, entries that should have been 0 (black), were not. This gave me very small denominators, causing the correlation to blow up and give me false positives. This is why png masks, or using TM_SQDIFF which does not have the denominator, fixes the problem.
Here is the end result and code, using TM_SQDIFF and png masks:
import cv2

MASK_DIR = {path to masks}
RES_DIR = {path to save match results}

MATCH_THRESH = 11
MATCH_RES = 1  #specifies degree-interval at which to match
#Match thresholds and resolution were empirically tuned

def make_masks():
    """ Makes masks from tmpl{0...359}.png in TMPL_DIR.
    Saves masks as mask{0...359}.png in MASK_DIR
    """
    for deg in range(360):
        tmpl = cv2.imread(os.path.join(TMPL_DIR, 'tmpl%d.png' %deg),
            cv2.IMREAD_GRAYSCALE)
        ret2, mask = cv2.threshold(tmpl, 0, 255,
            cv2.THRESH_BINARY+cv2.THRESH_OTSU)
        cv2.imwrite(os.path.join(MASK_DIR, 'mask%d.png' %deg), mask)
    return

def match_and_draw(img_name):
    """ Apply template matching to img_name in IMG_DIR, using
    tmpl{0...359}.png and mask{0...359}.png.
    Saves result with boxes drawn around matches as as img_name'r'.jpg in RES_DIR
    """
    print('Matching img %s' %img_name)
    img_rgb = cv2.imread(os.path.join(STRIPPED_DIR, img_name))	img_gray = cv2.cvtColor(img_rgb, cv2.COLOR_BGR2GRAY)
    for deg in range(0, 360, MATCH_RES):
        tmpl = cv2.imread(os.path.join(TMPL_DIR, 'tmpl%d.png' %deg),
            cv2.IMREAD_GRAYSCALE)
        mask = cv2.imread(os.path.join(MASK_DIR, 'mask%d.png' %deg),
            cv2.IMREAD_GRAYSCALE)

        w, h = tmpl.shape[::-1]
        res = cv2.matchTemplate(img_gray, tmpl, cv2.TM_SQDIFF, mask=mask)
        loc = np.where(res < MATCH_THRESH)
        for pt in zip(*loc[::-1]):
            cv2.rectangle(img_rgb, pt, (pt[0] + w, pt[1] + h), (0,0,255), 2)
            print('Match for deg{}, pt({}, {}), sqdiff {}'.
                format(deg,pt[0],pt[1],res[pt[1],pt[0]]))
    img_name = "".join(img_name.split('_')[:-1])
    cv2.imwrite(os.path.join(RES_DIR, img_name+'_r.jpg'), img_rgb) #eg M21_r.jpg
    return
Again, a method for bulk processing of images is in the complete code at the bottom of this page.
Conclusion
Now, I have completed my first goal of locating all the arrows. Of course, the current code only finds and draws bounding boxes on images, which is useful for debugging purposes. It is easy to modify my code to extract the coordinates of the boxes, which tells me roughly where my arrows are (the top left corner of the boxes are given by the pt variable in the code block above).
My next step is to transform these points, using the orientation information of the matching templates, into pixels that the arrows point to, which will be our ground truth. This doesn’t have to be exact of course, since we only need to tell our neural net roughly where to look, and if the ground-truth pixel is within the patch returned by the neural net.
Also, notice that the current program may output a couple of matching points for each arrow. I would need to coalesce these points into a single point for an accurate mitosis count. I will talk about my point transformation and coalescing algorithm in Part 2!
Complete Code
Below is the complete code for Part 1, with added error handling and print statements.
import os
import re
import cv2
import numpy as np
from scipy import misc, ndimage
from multiprocessing import Pool

IMG_DIR = {path to original images}
STRIPPED_DIR = {path to save stripped images}
TMPL_DIR = {path to templates}
MASK_DIR = {path to masks}
RES_DIR = {path to save match results}

GREEN = np.array([89, 248,  89])
MATCH_THRESH = 11
MATCH_RES = 1  #specifies degree-interval at which to match
#Match thresholds and resolution were empirically tuned

def strip(img_name):
    """ Removes background from img_name in IMG_DIR, leaving only green arrows.
    Saves stripped image in STRIPPED_DIR, as img_name's'.jpg """
    print('Stripping img %s' %img_name)
    try:
        arr = misc.imread(os.path.join(IMG_DIR, img_name))
    except IOError:
        print('Failed to strip img %s. Image not found.' %img_name)
        return
    (x_size, y_size, z_size) = arr.shape
    for x in range(x_size):
        for y in range(y_size):
            if not np.array_equal(arr[x, y], GREEN):
                arr[x, y] = np.array([0, 0,  0])
    img_name = "".join(img_name.split('.')[:-1])
    misc.imsave(os.path.join(STRIPPED_DIR, img_name+'_s.jpg'), arr) #eg M21_s.jpg
    return

def strip_all(num_processes=2):
    """ Applies strip() to all images in IMG_DIR.

    This method uses multiprocessing:
    num_processes -- the number of parallel processes to spawn for this task.
    (default 2)
    """
    imgs = [i for i in os.listdir(IMG_DIR) if re.match(r'M[0-9]*.jpg', i)]
    print('Stripping background from %d images' %len(imgs))
    pool = Pool(num_processes)
    pool.map(strip, imgs)
    pool.close()
    pool.join()
    print('Done')
    return

def make_templates():
    """ Makes templates for rotational-deg=0...359 from base.jpg in TMPL_DIR.
    Saves rotated templates as tmpl{deg}.png in TMPL_DIR
    """
    try:
        base = misc.imread(os.path.join(TMPL_DIR,'base_short.png'))
    except IOError:
        print('Failed to make templates. Base template is not found')
        return
    for deg in range(360):
        tmpl = ndimage.rotate(base, deg)
        misc.imsave(os.path.join(TMPL_DIR, 'tmpl%d.png' %deg), tmpl)
    return

def make_masks():
    """ Makes masks from tmpl{0...359}.png in TMPL_DIR.
    Saves masks as mask{0...359}.png in MASK_DIR
    """
    for deg in range(360):
        tmpl = cv2.imread(os.path.join(TMPL_DIR, 'tmpl%d.png' %deg),
            cv2.IMREAD_GRAYSCALE)
        if tmpl is None:
            print('Failed to make mask {0}. tmpl{0}.png is not found.'.
                format(deg))
        else:
            ret2, mask = cv2.threshold(tmpl, 0, 255,
                cv2.THRESH_BINARY+cv2.THRESH_OTSU)
            cv2.imwrite(os.path.join(MASK_DIR, 'mask%d.png' %deg), mask)
    return

def match_and_draw(img_name):
    """ Applies template matching to img_name in IMG_DIR, using
    tmpl{0...359}.png and mask{0...359}.png.
    Saves result with boxes drawn around matches as as img_name'r'.jpg in RES_DIR
    """
    print('Matching img %s' %img_name)
    img_rgb = cv2.imread(os.path.join(STRIPPED_DIR, img_name))
    if img_rgb is None:
        print('Failed to match img %s. Image not found.' %img_name)
        return
    img_gray = cv2.cvtColor(img_rgb, cv2.COLOR_BGR2GRAY)
    for deg in range(0, 360, MATCH_RES):
        tmpl = cv2.imread(os.path.join(TMPL_DIR, 'tmpl%d.png' %deg),
            cv2.IMREAD_GRAYSCALE)
        mask = cv2.imread(os.path.join(MASK_DIR, 'mask%d.png' %deg),
            cv2.IMREAD_GRAYSCALE)
        if tmpl is None or mask is None:
            print('Failed to match for tmpl %d.' %deg)
        else:
            w, h = tmpl.shape[::-1]
            res = cv2.matchTemplate(img_gray, tmpl, cv2.TM_SQDIFF, mask=mask)
            loc = np.where(res < MATCH_THRESH)
            for pt in zip(*loc[::-1]):
                cv2.rectangle(img_rgb, pt, (pt[0] + w, pt[1] + h), (0,0,255), 2)
                print('Match for deg{}, pt({}, {}), sqdiff {}'.
                    format(deg,pt[0],pt[1],res[pt[1],pt[0]]))
    img_name = "".join(img_name.split('_')[:-1])
    cv2.imwrite(os.path.join(RES_DIR, img_name+'_r.jpg'), img_rgb) #eg M21_r.jpg
    return

def match_all(num_imgs, start=1, num_processes=2):
    """ Applies match() to all images in STRIPPED_DIR.

    This method uses multiprocessing:
    num_processes -- the number of parallel processes to spawn for this task.
    (default 2)
    """
    imgs = [i for i in os.listdir(STRIPPED_DIR) if re.match(r'M[0-9]*_s.jpg', i)]
    print('Matching %d images' %len(imgs))
    pool = Pool(num_processes)
    pool.map(match_and_draw, imgs)
    pool.close()
    pool.join()
    print('Done')
    return
List of references
- ICPR 2012 Mitosis Detection Contest
- 2007 Paper on Grayscale Template-Matching Invariant to Rotation, Scale, Translation, Brightness and Contrast (Kim & Araujo)
- OpenCV template-matching tutorial in Python
- OpenCV thresholding tutorial in Python
- Helpful StackOverflow explanation of OpenCV’s different matching methods


